Kodak M531 User Manual
Browse online or download User Manual for Cameras Kodak M531. Kodak M531 User Manual
- Page / 66
- Table of contents
- TROUBLESHOOTING
- BOOKMARKS
- KODAK EASYSHARE M531 1
- Digital Camera 1
- Front view 3
- Back view 4
- Table of contents 1 5
- Table of contents 6
- 1 Setting up your camera 7
- Charging the battery 8
- Battery Charging light: 9
- • Orange: charging 9
- • Green: finished charging 9
- Turning on the camera 10
- Setting up your camera 11
- 2 Taking pictures/videos 12
- Taking a video 13
- Adjusting LCD brightness 14
- Using the optical zoom 15
- Using the flash 16
- Using different modes 17
- Using Scene (SCN) modes 18
- Using shortcuts 19
- Using the self-timer 20
- Using burst 20
- Taking panoramic pictures 21
- Sharing and tagging pictures 22
- Tagging pictures 24
- Tagging with keywords 25
- Using the keyboard 26
- 4 Reviewing and editing 27
- Deleting pictures/videos 28
- Magnifying a picture 29
- Reviewing and editing 30
- Play a slide show loop 32
- Cropping pictures 34
- Editing videos 35
- Copying pictures/videos 36
- 5 Doing more with your camera 37
- 32 www.kodak.com/go/support 38
- IMPORTANT: 38
- Doing more with your camera 39
- Using the Setup menu 40
- ■ WINDOWS OS: in My Computer 43
- ■ MAC OS: on your Desktop 43
- Printing pictures 44
- KODAK All-in-One Printer 45
- Ordering prints online 45
- 7 Troubleshooting 47
- Troubleshooting 48
- 44 www.kodak.com/go/support 50
- Picture quality problems 50
- Getting help on the Web 51
- 8 Appendix 52
- Appendix 53
- Care and maintenance 54
- Storage capacities 55
- Important safety instructions 55
- Extending battery life 56
- ° F (5° C). When using 56
- Limited warranty 57
- Regulatory compliance 58
- Canadian DOC statement 59
- Australian C-Tick 60
- VCCI Class B ITE 60
- Russian GOST-R 60
- China RoHS 60
- Korean Class B ITE 61
- Korean Li-Ion Regulatory 61
Summary of Contents
KODAK EASYSHARE M531Digital CameraExtended user guidewww.kodak.comFor interactive tutorials: www.kodak.com/go/howtoFor help with your camera:www.kodak
4 www.kodak.com/go/supportSetting up your cameraTurning on the cameraSetting the language and date/timeNOTE: To change language in the future, use th
Setting up your camerawww.kodak.com/go/support 5Storing pictures on an optional SD or SDHC CardYour camera has internal memory. We strongly recommend
6 www.kodak.com/go/support2 Taking pictures/videosTaking picturesTo get clear, focused pictures:1 The camera turns on in Smart Capture mode. (If it’s
Taking pictures/videoswww.kodak.com/go/support 7Taking a video1 Press the Mode button, then until the LCD displays Video , then press OK.2 Press th
8 www.kodak.com/go/supportTaking pictures/videosAdjusting LCD brightnessYou can adjust the LCD brightness for your environment or to conserve battery
Taking pictures/videoswww.kodak.com/go/support 9Using the optical zoom1 Use the LCD to frame your subject.2 To zoom in, press Telephoto (T). To zoom o
10 www.kodak.com/go/supportTaking pictures/videosUsing the flashPress the Flash button repeatedly until the LCD displays the desired flash mode.Flash
Taking pictures/videoswww.kodak.com/go/support 11Using different modesPress the Mode button, then until the LCD displays the mode that best suits yo
12 www.kodak.com/go/supportTaking pictures/videosUsing Scene (SCN) modesChoose a Scene mode—for great pictures in practically any situation.1 Press th
Taking pictures/videoswww.kodak.com/go/support 13Using shortcutsYour camera has a clean, uncluttered interface. For quick access to the most popular c
Eastman Kodak CompanyRochester, New York 14650© Eastman Kodak Company, 2010All screen images are simulated.Kodak, EasyShare, and Pulse are trademarks
14 www.kodak.com/go/supportTaking pictures/videosUsing the self-timerUse the self-timer when you want to be included in a picture, or to ensure a stea
Taking pictures/videoswww.kodak.com/go/support 15Taking panoramic picturesUse panorama to “stitch” up to 3 pictures into a panoramic scene.NOTE: Only
16 www.kodak.com/go/support3 Sharing and tagging picturesSharing pictures through social networksIt’s never been easier to share pictures on your favo
Sharing and tagging pictureswww.kodak.com/go/support 17Choose which social networking sites to display on your cameraYou can show/hide social networki
18 www.kodak.com/go/supportSharing and tagging picturesTagging picturesTag pictures to make them easy to find, later. You can tag pictures in 2 ways:
Sharing and tagging pictureswww.kodak.com/go/support 19Need to update a name?If you meet a new friend—James—but you already have pictures tagged with
20 www.kodak.com/go/supportSharing and tagging picturesUsing the keyboardThe keyboard appears when you need to enter text.1 Press to choose a lett
www.kodak.com/go/support 214 Reviewing and editingReviewing pictures/videos1 Press the Review button.2 Press for previous/next picture/video. To
22 www.kodak.com/go/supportReviewing and editingDeleting pictures/videos1 Press the Review button.2 Press for previous/next picture/video.3 Press t
Reviewing and editingwww.kodak.com/go/support 23Viewing pictures/videos in different waysMagnifying a picture1 Press Telephoto (T) to magnify 1X–8X.2
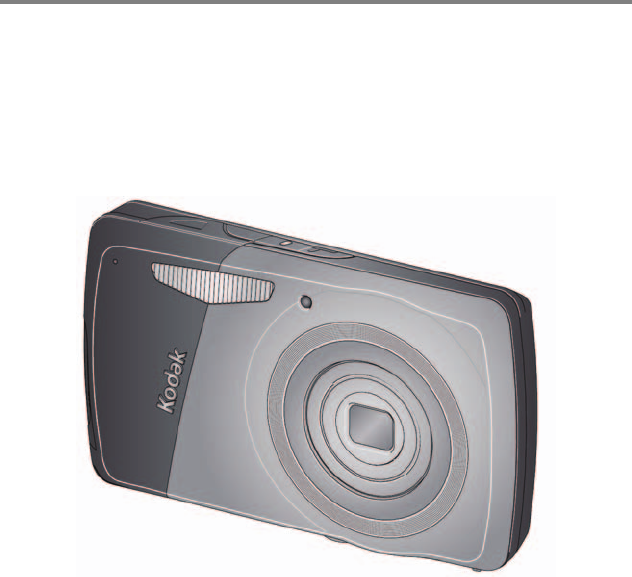
Product featureswww.kodak.com/go/support iFront viewNOTE: To use the built-in Help system, see page 41.LensMicrophoneFlashSelf-timer/Video light
24 www.kodak.com/go/supportReviewing and editingA smarter way to find and enjoy your pictures Tag pictures—by people or keywords—to make them easy to
Reviewing and editingwww.kodak.com/go/support 25Understanding the review icons* For more about shortcuts, see page 13.Know when your battery needs cha
26 www.kodak.com/go/supportReviewing and editingCreating a multimedia slide showUse Multimedia Slide Show to display your pictures/videos on the LCD.
Reviewing and editingwww.kodak.com/go/support 27Displaying pictures/videos on a televisionYou can display pictures/videos on a television, computer mo
28 www.kodak.com/go/supportReviewing and editingUsing the menu button in review1 Press the Review button, then the Menu button.2 Press to choose
Reviewing and editingwww.kodak.com/go/support 29Editing videosYou can do incredible things with your videos.Making a picture from a videoYou can choos
30 www.kodak.com/go/supportReviewing and editingSelecting multiple pictures/videosUse the multi-select feature when you have two or more pictures to p
www.kodak.com/go/support 315 Doing more with your cameraTo use the built-in Help system, see page 41.Using the menu button to change settingsYou can
32 www.kodak.com/go/supportDoing more with your cameraPreset Keyword TagCreate keywords (page 19) and assign them to all pictures/videos that you take
Doing more with your camerawww.kodak.com/go/support 33White BalanceChoose your lighting condition. (Available only in Program and Panorama modes.)Auto
ii www.kodak.com/go/supportProduct featuresBack viewNOTE: To use the built-in Help system, see page 41.OK, Wide Angle/Telephoto buttonBattery compartm
34 www.kodak.com/go/supportDoing more with your cameraVideo settings (available when the camera is in a Video mode)To use the built-in Help system, se
Doing more with your camerawww.kodak.com/go/support 35Share Button SettingsChoose what is displayed when the Share button is pressed.Show or hide: In
36 www.kodak.com/go/supportDoing more with your cameraLanguage Choose your language.Reset All Camera Settings Reset settings to their default.Computer
www.kodak.com/go/support 376 Transferring, printing picturesTransferring pictures to your computerDownload KODAK Software—so it’s easy to transfer an
38 www.kodak.com/go/supportTransferring, printing picturesPrinting picturesDirect printing with a KODAK All-in-One PrinterIMPORTANT: To print using PI
Transferring, printing pictureswww.kodak.com/go/support 39Disconnecting the camera from a KODAK All-in-One Printer1 Turn off the camera and printer.2
40 www.kodak.com/go/supportTransferring, printing picturesMarking your pictures for printYou can mark your pictures so they are easy to print:1 Press
www.kodak.com/go/support 417 TroubleshootingGetting help from your cameraYour camera offers a built-in Help system. It describes every setting for ev
42 www.kodak.com/go/supportTroubleshootingTroubleshootingCamera problemsStatus SolutionCamera does not turn on Make sure the battery is charged and i
Troubleshootingwww.kodak.com/go/support 43Computer/connectivity problemsDirect printing (PICTBRIDGE enabled printer) problemsYou cannot take a picture
www.kodak.com/go/support iiiTable of contents 11 Setting up your camera ...1A
44 www.kodak.com/go/supportTroubleshootingPicture quality problemsStatus SolutionPicture is not clear To automatically set exposure and focus, press
Troubleshootingwww.kodak.com/go/support 45Getting help on the WebCameraSoftwareOtherGet support for your product (FAQs, troubleshooting information, a
46 www.kodak.com/go/support8 AppendixSpecificationsCCD—1/2.3-typeEffective pixels—14 MP (4314 x 3242) LCD—2.7 in. (6.9 cm) LCD; 230K pixels; 4:3 aspec
Appendixwww.kodak.com/go/support 47Program mode: Auto 64–320; manual 64, 100, 200, 400, 800, 1000Exposure metering—TTL-AE; Face Priority, Multi-Zone,
48 www.kodak.com/go/supportAppendixSpeaker—YesPICTBRIDGE support—YesPower—KODAK Li-Ion Rechargeable Digital Camera Battery KLIC-7006; 5V AC-to-USB bat
Appendixwww.kodak.com/go/support 49Storage capacitiesThe LCD displays the approximate number of pictures (or minutes/seconds of video) remaining. For
50 www.kodak.com/go/supportAppendix Remove the battery when the product is stored for an extended period of time. In the unlikely event that battery
Appendixwww.kodak.com/go/support 51Limited warrantyKodak warrants its digital cameras and accessories (excluding batteries) to be free from malfunctio
52 www.kodak.com/go/supportAppendixspecified on your Kodak product packaging. The option of repair, replacement, or refund is Kodak's only obliga
Appendixwww.kodak.com/go/support 53interference to radio communications. However, there is no guarantee that interference will not occur in a particul
iv www.kodak.com/go/supportTable of contentsUnderstanding the review icons...25Creatin
54 www.kodak.com/go/supportAppendixCEHereby, Eastman Kodak Company declares that this KODAK Product is in compliance with the essential requirements a
Appendixwww.kodak.com/go/support 55Korean Class B ITEKorean Li-Ion Regulatory
56 www.kodak.com/go/supportIndex 1AA/V out, 27about this camera, 36accessoriesbattery, 50buying, 45SD/SDHC Card, 5add keywords, names, 20AF control (S
www.kodak.com/go/support 57IndexdownloadKODAK Software, 37download pictures, 37Eedit videos, 29emailing pictures, videos, 20expected battery life, 50
58 www.kodak.com/go/supportIndexmanner/museum, 12markingfor email, 20memoryinserting card, 5menu settings, 31modes, 11auto, 11backlight, 12beach, 12ch
www.kodak.com/go/support 59Indexrecycling, disposal, 48regulatory information, 52repair, 45reset camera, 36reviewing pictures/videoas you take them,
60 www.kodak.com/go/supportIndextext, 13time, setting, 4timer, shutter delay, 14tipsbattery guidelines, 50care & maintenance, 48transfer pictures,
www.kodak.com/go/support 11 Setting up your cameraAttaching the strapLoading the KLIC-7006 batteryPurchase extra batteries for your event www.kodak.
2 www.kodak.com/go/supportSetting up your cameraCharging the batteryUsing the in-camera battery chargerCharge the Li-Ion battery whenever necessary.If
Setting up your camerawww.kodak.com/go/support 3Using the external battery chargerCharge the battery whenever necessary.Purchase extra batteries www.
More documents for Cameras Kodak M531


Related products and manuals for Cameras Kodak M531
 (106 pages)
(27 pages)
(126 pages)
(68 pages)
(29 pages)
(79 pages)
(78 pages)
(76 pages)
(29 pages)
(91 pages)
(70 pages)
(29 pages)
(120 pages)
(74 pages)
(26 pages)
(27 pages)
(72 pages)
(78 pages)
(27 pages)
(2 pages)
(106 pages)
(27 pages)
(126 pages)
(68 pages)
(29 pages)
(79 pages)
(78 pages)
(76 pages)
(29 pages)
(91 pages)
(70 pages)
(29 pages)
(120 pages)
(74 pages)
(26 pages)
(27 pages)
(72 pages)
(78 pages)
(27 pages)
(2 pages)
© 2020, manymanuals.com. All rights reserved. | 0.083 s |
 Manymanuals.com
 Manymanuals.de
 Manymanuals.fr
 Manymanuals.it
 Manymanuals.pl
 Manymanuals.cz
 Manymanuals.es
 Manymanuals-pt.com
Comments to this Manuals