Kodak ZD15 User Manual
Browse online or download User Manual for Cameras Kodak ZD15. Kodak ZD15 User Manual
- Page / 74
- Table of contents
- TROUBLESHOOTING
- BOOKMARKS
- KODAK EASYSHARE ZD15 1
- Digital Camera 1
- Back view 3
- Front view 4
- Table of contents 1 5
- Table of contents 6
- 1 Setting up your camera 7
- Turning on the camera 8
- Setting up your camera 9
- 2 Taking pictures/videos 10
- Taking a video 11
- Capture modes 12
- Scene modes 13
- Using optical zoom 14
- Using the flash 15
- Using the Focus button 16
- Using the self-timer 17
- Using burst 17
- Taking panoramic pictures 18
- Getting help from your camera 19
- P, A, S, and M modes 20
- Taking pictures/videos 21
- Working with pictures/videos 24
- Deleting pictures/videos 25
- Using shortcuts 27
- Adding sound tags 28
- Cropping pictures 29
- Editing videos 31
- Using video bookmarks 32
- Making a video action print 33
- Play a multimedia slide show 34
- Copying pictures/videos 37
- 4 Using the menu button 38
- Using the menu button 39
- 34 www.kodak.com/go/support 40
- Using the Setup menu 41
- 36 www.kodak.com/go/support 42
- CAUTION: 43
- Formatting deletes all 43
- Transferring, printing, and 44
- Using other options 45
- Connect the 45
- Printing pictures 46
- Ordering prints online 47
- Marking your pictures 48
- 6 Troubleshooting 52
- Troubleshooting 53
- 48 www.kodak.com/go/support 54
- 50 www.kodak.com/go/support 56
- LCD messages 56
- 7 Getting help 57
- 52 www.kodak.com/go/support 58
- 8 Appendix 59
- Appendix 60
- Storage capacities 61
- Important safety instructions 62
- Battery life 63
- Care and maintenance 64
- Limited warranty 64
- Regulatory compliance 66
- ICES-003 67
- China RoHS 68
- Russian GOST-R 68
Summary of Contents
KODAK EASYSHARE ZD15Digital CameraExtended user guidewww.kodak.comFor interactive tutorials, visit www.kodak.com/go/howtoFor help with your camera, vi
4 www.kodak.com/go/support2 Taking pictures/videosTaking a pictureNOTE: For more information on Smart Capture and other modes, see page 6. Framing ma
Taking pictures/videoswww.kodak.com/go/support 5Taking a videoReviewing the picture/video just takenAfter you take a picture/video, the LCD displays a
6 www.kodak.com/go/supportTaking pictures/videosCapture modesCapture mode ForSmart CaptureGeneral picture taking—it offers excellent image quality and
Taking pictures/videoswww.kodak.com/go/support 7Scene modes1 Turn the Mode dial to Scene .2 Press to highlight Scene modes.NOTE: If the mode des
8 www.kodak.com/go/supportTaking pictures/videosUsing optical zoomUse optical zoom to get up to 10X closer to your subject while taking pictures/video
Taking pictures/videoswww.kodak.com/go/support 9Using the flash Use the flash when you take pictures at night, indoors, or outdoors in heavy shadows.
10 www.kodak.com/go/supportTaking pictures/videosUsing the Focus button1 In most Still modes, press the Focus button until the desired focus icon is d
Taking pictures/videoswww.kodak.com/go/support 11Using the self-timerUse the self-timer when you want to be included in a picture, or to ensure a stea
12 www.kodak.com/go/supportTaking pictures/videosTaking panoramic picturesUse panorama to “stitch” up to 3 pictures into a panoramic scene.NOTE: For
Taking pictures/videoswww.kodak.com/go/support 13Getting help from your cameraYou want the most from your camera. You want to understand: What it can
Eastman Kodak CompanyRochester, NY 14650© Kodak, 2009All screen images are simulated.Kodak, EasyShare, and Perfect Touch are trademarks of Eastman Kod
14 www.kodak.com/go/supportTaking pictures/videosP, A, S, and M modesUse these modes when you want more control over your camera and pictures.NOTE: S
Taking pictures/videoswww.kodak.com/go/support 15Changing P, A, S, or M mode settingsPASM modes control the aperture (f-number, also known as f-stop),
16 www.kodak.com/go/supportTaking pictures/videosUsing exposure compensation to adjust brightnessIn P, A, S, and Panorama modes, you can adjust exposu
Taking pictures/videoswww.kodak.com/go/support 17Using the histogram to view picture brightnessUse the histogram to evaluate the distribution of light
18 www.kodak.com/go/support3 Working with pictures/videosReviewing pictures/videosPress the Review button to view and work with your pictures/videos.
Working with pictures/videoswww.kodak.com/go/support 19Playing a video 1 Press the Review button.2 Press to locate previous/next video.3 Press OK to
20 www.kodak.com/go/supportWorking with pictures/videosProtecting pictures/videos from deletion1 Press the Review button, then to find a picture.2 P
Working with pictures/videoswww.kodak.com/go/support 21Using shortcutsFor quick access to the most popular functions: 1 Press the Info button. The s
22 www.kodak.com/go/supportWorking with pictures/videosAdding sound tagsYou can record a voice or sound (up to 1 minute long) to add to a picture.NOTE
Working with pictures/videoswww.kodak.com/go/support 23Cropping picturesYou can crop a picture so that only the desired portion of the picture remains
Product featureswww.kodak.com/go/support iBack view1 Speaker 8 Self-timer/Burst button2 Mode dial 9 3V DC-In/USB/AV out3 On/Off button 10 Strap post4
24 www.kodak.com/go/supportWorking with pictures/videosUsing KODAK PERFECT TOUCH TechnologyKODAK PERFECT TOUCH Technology helps ensure better, brighte
Working with pictures/videoswww.kodak.com/go/support 25Editing videosMaking a picture from a videoYou can choose a single frame from a video, then mak
26 www.kodak.com/go/supportWorking with pictures/videosUsing video bookmarksYou can set bookmarks at interesting places in your video, then jump from
Working with pictures/videoswww.kodak.com/go/support 27Making a video action printFrom a video, you can make a 4-, 9-, or 16-up picture, suitable for
28 www.kodak.com/go/supportWorking with pictures/videosPlay a multimedia slide showTo show all pictures/videos1 Press the Review button. 2 Press the
Working with pictures/videoswww.kodak.com/go/support 29Displaying pictures/videos on a televisionYou can display pictures/videos on a television, comp
30 www.kodak.com/go/supportWorking with pictures/videosViewing pictures/videos in different waysViewing as thumbnails (multi-up)1 Press the Review bu
Working with pictures/videoswww.kodak.com/go/support 31Copying pictures/videosYou can copy pictures/videos from a card to internal memory or from inte
32 www.kodak.com/go/support4 Using the menu buttonYou can change settings to get the best results from your camera.1 Press the Menu button.2 Press
Using the menu buttonwww.kodak.com/go/support 33Color ModeChoose color tones.High ColorNatural ColorLow ColorBlack & WhiteSepiaNOTE: EASYSHARE So
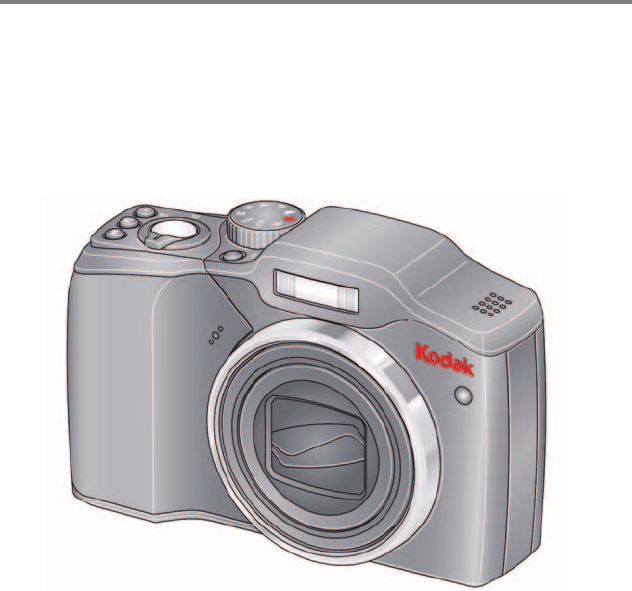
ii www.kodak.com/go/supportProduct featuresFront view1Flash2 Self-timer/Video/AF Assist light3Lens/Cover4 Microphone4213
34 www.kodak.com/go/supportUsing the menu buttonExposure MeteringEvaluate light levels at specific areas of a scene.Available only in P, A, S, M and P
Using the menu buttonwww.kodak.com/go/support 35Using the Setup menuIMPORTANT: Your camera offers a built-in Help system. See page 13.Press Menu, , ,
36 www.kodak.com/go/supportUsing the menu buttonCapture Frame GridUse the frame grid to divide the LCD screen into thirds, vertically and horizontally
Using the menu buttonwww.kodak.com/go/support 37Sound Volume HighMediumLowMuteDate & Time See page 2. The format chosen is used for all date/time
38 www.kodak.com/go/support5 Transferring, printing, and sharing picturesInstalling the softwareCAUTION:Install EASYSHARE Software before connecting t
Transferring, printing, and sharing pictureswww.kodak.com/go/support 39Transferring pictures with the USB cableUsing other optionsYou can also use a K
40 www.kodak.com/go/supportTransferring, printing, and sharing picturesPrinting picturesDirect printing with a KODAK All-in-One PrinterYour camera is
Transferring, printing, and sharing pictureswww.kodak.com/go/support 41Disconnecting the camera from a KODAK All-in-One Printer1 Turn off the camera a
42 www.kodak.com/go/supportTransferring, printing, and sharing picturesMarking your picturesYou can mark your pictures so they are easy to: Print Em
Transferring, printing, and sharing pictureswww.kodak.com/go/support 43Marking pictures/videos for emailingIt’s simple to mark pictures so that they’r
www.kodak.com/go/support iiiTable of contents 11 Setting up your camera ...1A
44 www.kodak.com/go/supportTransferring, printing, and sharing picturesMarking pictures/videos as favoritesTo make your favorite pictures/videos easie
Transferring, printing, and sharing pictureswww.kodak.com/go/support 45Assigning a tag to the pictures/videos you take nextUse the Set Tag feature to
46 www.kodak.com/go/support6 TroubleshootingFor step-by-step product support, visit www.kodak.com/go/zd15support and select Interactive Troubleshootin
Troubleshootingwww.kodak.com/go/support 47In Review mode, a blue or black screen is displayed instead of a picture. Transfer the picture to the compu
48 www.kodak.com/go/supportTroubleshootingCamera does not recognize SD/SDHC Card. Purchase a certified SD/SDHC Card. Format the card (see page 37).C
Troubleshootingwww.kodak.com/go/support 49Camera/computer communicationsIf Try one or more of the followingCannot transfer pictures. (The Add New Hard
50 www.kodak.com/go/supportTroubleshootingLCD messagesIf Try one or more of the followingNo images to display Change image storage location setting
www.kodak.com/go/support 517 Getting helpHelpful linksCameraSoftwareOtherEmail, write, or phone customer support www.kodak.com/go/contactGet support
52 www.kodak.com/go/supportGetting helpNOTE: If you have questions concerning this product, you may speak with Kodak customer support.Australia 1800
www.kodak.com/go/support 538 AppendixCamera specificationsFor more specifications, visit www.kodak.com/go/zd15support.Image sensor—1/2.3-type (4:3 as
iv www.kodak.com/go/supportTable of contentsEditing videos ...
54 www.kodak.com/go/supportAppendixFocus system—TTL-AF (through-the-lens auto focus); Multi-zone AF, and Center-zone AF; Working range: 0.5 m (1.6 ft)
Appendixwww.kodak.com/go/support 55Output image size—10 MP (4:3): 3648 x 2736 pixels8.9 MP (3:2): 3648 x 2432 pixels7.5 MP (16:9): 3648 x 2048 pixels5
56 www.kodak.com/go/supportAppendixImportant safety instructionsCAUTION:Do not disassemble this product; there are no user-serviceable parts inside. R
Appendixwww.kodak.com/go/support 57 Dispose of batteries according to local and national regulations. Visit www.kodak.com/go/kes. Do not charge non-
58 www.kodak.com/go/supportAppendixCare and maintenance If you suspect water has gotten inside the camera, remove the battery and card. Allow all com
Appendixwww.kodak.com/go/support 59remanufactured materials. If it is necessary to replace the entire Product, it may be replaced with a remanufacture
60 www.kodak.com/go/supportAppendixOutside the United States and Canada In countries other than the United States and Canada, the terms and conditions
Appendixwww.kodak.com/go/support 61Canadian DOC statementDOC Class B Compliance—This Class B digital apparatus complies with Canadian ICES-003.Observa
62 www.kodak.com/go/supportAppendixChina RoHSRussian GOST-REastman Kodak CompanyRochester, NY 14650AIO-40
www.kodak.com/go/support 63Index 1AA/V out, 11about this camera, 6accessories, 2battery, 5buying, 1SD/SDHC card, 3advanced digital zoom, 5AF control,
www.kodak.com/go/support 11 Setting up your cameraAttaching the strapLoading the batteriesOther battery types see page 57Purchase accessories, such
64 www.kodak.com/go/supportIndexdoing more with your camera, 1download pictures, 1EEASYSHARE Software, installing, 1emailing pictures, videos, 6error
www.kodak.com/go/support 65Indexsoftware on, 1magnify a picture, 1maintenance, camera, 6make picture from video, 7manner/museum, 4manual, 11memoryins
66 www.kodak.com/go/supportIndexsetting, 5using, 2Rready light,1,4recycling, disposal, 6, 10red-eye, flash, 7regulatory information, 9repair, 1reset c
www.kodak.com/go/support 67Indexself-timer, 9sharpness, 3sound volume, 5tag, 4video out, 6video size, 1white balance, 2sharpness, 3shutterbutton, 1pr
68 www.kodak.com/go/supportIndexcopying, 13emailing tagged, 6out, 6protecting, 3review icons, 14reviewing, 1size, 1storage capacities, 4transfer, 1vie
2 www.kodak.com/go/supportSetting up your cameraTurning on the cameraSetting the language, date/timeNOTE: To change language or date/time in the futu
Setting up your camerawww.kodak.com/go/support 3Storing pictures on an (accessory) SD or SDHC CardYour camera has internal memory. You can purchase an
More documents for Cameras Kodak ZD15


Related products and manuals for Cameras Kodak ZD15
 (26 pages)
(75 pages)
(67 pages)
(66 pages)
(26 pages)
(65 pages)
(64 pages)
(63 pages)
(76 pages)
(76 pages)
(67 pages)
(64 pages)
(69 pages)
(28 pages)
(64 pages)
(27 pages)
(106 pages)
(28 pages)
(82 pages)
(66 pages)
(26 pages)
(75 pages)
(67 pages)
(66 pages)
(26 pages)
(65 pages)
(64 pages)
(63 pages)
(76 pages)
(76 pages)
(67 pages)
(64 pages)
(69 pages)
(28 pages)
(64 pages)
(27 pages)
(106 pages)
(28 pages)
(82 pages)
(66 pages)
© 2020, manymanuals.com. All rights reserved. | 0.477 s |
 Manymanuals.com
 Manymanuals.de
 Manymanuals.fr
 Manymanuals.it
 Manymanuals.pl
 Manymanuals.cz
 Manymanuals.es
 Manymanuals-pt.com
Comments to this Manuals